both of my children have always been climbers. brandon climbed out of his crib and into his toddler bed at 13 months old so i was ready for little madison to do the same.
Brandon had recently gotten a new loft bed so that he could fit some of his furniture under it, so that left his old bed for Madison.
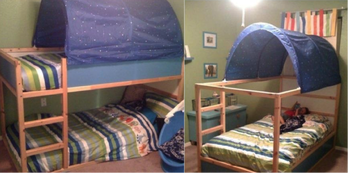
This is the bed we started with
It's a reversible bed which is fantastic. it can be used as a tell canopy bed with storage for an extra mattress underneath, or as a bunk bed with a mattress on bottom, or as a mini loft bed with play space underneath. Both of my kids have pretty small rooms so anything to get a little bit more out of their space. Great bed... but it's a natural color wood with blue and white panels. Didn't exactly go with the current pink, grey, and white theme of her room.
This is the IKEA KURA BED which they now make with only white panels not the blue. We decided to take the whole thing apart and paint it white. I have no pictures of this process and truthfully regret starting this project in winter. I had to work around the weather, and it took forever to complete. I used spray on primer to cover each board as well as the blue side of the panels. It took several cans and left it a bit more lumpy and drippy that I had hoped for. Some light sanding fixed most of those spots. (oh and I had to sand the blue panels before painting as well. I then choose a super glossy white paint and proceeded to cover my driveway in paint... er... paint all of the pieces of the bed white.
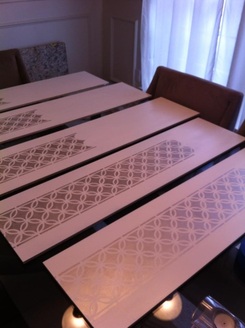
I knew that I wanted to stencil a pattern on the white panels so I found a fantastic MARTHA STEWART STENCIL and headed to the home improvement store to choose some paint. The kid in the store sold me on this super shimmery glaze. Looks awesome as a finished product but I neglected to read the label that it takes 24 hours for the glaze to dry. Very short stencil + very long panels being painted+24 dry time between each stencil application = very awesome patient friend needed. My go to crafty friend Caitlin painted most of the shorter panels for me to which I am very grateful for. I kept wishing that my other crafty HEIDI had lived closer to me during this seemingly never ending project so that I could have bribed her to help too.
This is the IKEA KURA BED which they now make with only white panels not the blue. We decided to take the whole thing apart and paint it white. I have no pictures of this process and truthfully regret starting this project in winter. I had to work around the weather, and it took forever to complete. I used spray on primer to cover each board as well as the blue side of the panels. It took several cans and left it a bit more lumpy and drippy that I had hoped for. Some light sanding fixed most of those spots. (oh and I had to sand the blue panels before painting as well. I then choose a super glossy white paint and proceeded to cover my driveway in paint... er... paint all of the pieces of the bed white.
I knew that I wanted to stencil a pattern on the white panels so I found a fantastic MARTHA STEWART STENCIL and headed to the home improvement store to choose some paint. The kid in the store sold me on this super shimmery glaze. Looks awesome as a finished product but I neglected to read the label that it takes 24 hours for the glaze to dry. Very short stencil + very long panels being painted+24 dry time between each stencil application = very awesome patient friend needed. My go to crafty friend Caitlin painted most of the shorter panels for me to which I am very grateful for. I kept wishing that my other crafty HEIDI had lived closer to me during this seemingly never ending project so that I could have bribed her to help too.
stencil work in progress
| 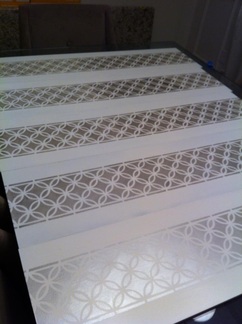
love how shiny they came out. maybe worth the long dry time
|
Once we got the bed back together I just happened to be reading online that it's not good to put a mattress directly on the floor because of the lack of airflow underneath. Since Madison would be sleeping on the bottom bunk until she was old enough to be trusted on the top this seemed like an important thing to consider.
While wandering through the IKEA as is section, we happened upon a great deal on bed base slats. Seems they had just discontinued this particular style so we got it for about $30. It has springy slats and each side of the bed can adjust up and down. This proved to be great for a little girl with a stuffy nose. the whole thing was already assembled and fit perfectly inside the existing bed structure.
Madison LOVED her new bed. And it looks awesome in her room. We decided to reassemble the bed with out the lowest ladder bar. We didn't really want her to have access to the top bunk until we could trust her to get down safely by herself. She was just 1 at this point and loved to climb anything. We found her on top of her brother's full size loft bed and knew we would have to do something. Honestly, we didn't even tell her that the top bed existed so she didn't even think to try to climb up there.
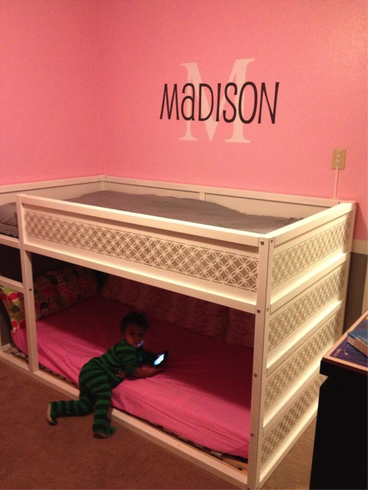
Regretting not painting the bad slats on bottom white... but not enough to go back and do so now.
| 
love how the end panels turned out
|
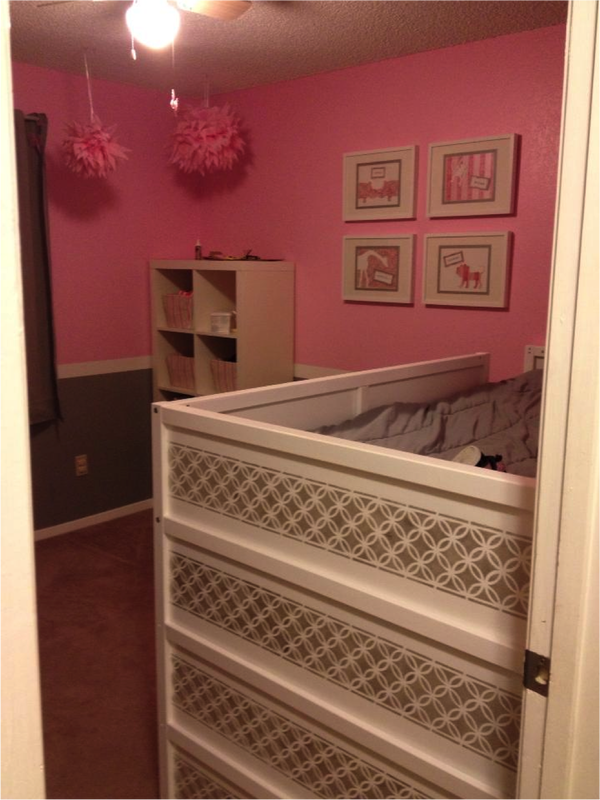
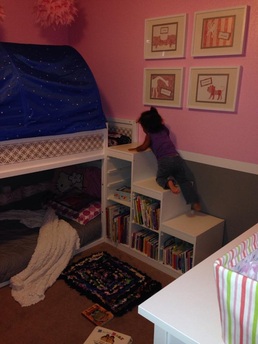
Just recently, she discovered the top bunk and I caught her on her way up the ladder (even with the missing ladder rung). We decided it was time to give her a safe way up... and down! we have an IKEA TROFAST toy storage system in the living room for their toys and it just occurred to me that it would make a perfect staircase up to the top for her. Our toy storage bench was natural wood color but another stroll though the as is IKEA section (we live really close so I find myself there way more often that I ought to) and we scored a white unit at a good discount. I purchased two little SHELVES to use with it as it would be storing more books than toys. We had to take the bed all the way apart and reconfigure it a different way to allow space for the stairs. We moved it to a different wall as well. Here is a warning, although there are two options of which side you can put the ladder on while assembling the bed, there are limitations. We were trying to put the solid panels on the left side and the ladder on the right... that doesn't work... but it took us about an hour or more to figure that out. I just wanted all of our awesome stenciling to be showcased, so we ended up just turing the panels around so that they now show on the inside of the bed and can be seen in the new set up. The Trofast unit was put right in front of the ladder as the new route up to the play space.
| 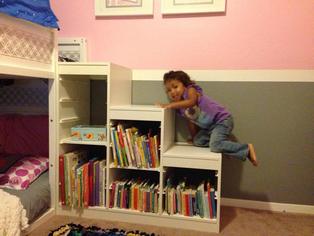
I know what you are thinking, she could fall off of the steps. You must understand the monkey that is my daughter. I promise she's safe... and it's a much safer option than the ladder coming down and loosing her footing. Also it's just a play space, not a sleeping space.
|
We put some little baskets of soft toys and a few books up in the top bunk. It's now her "hideout" for reading and playing. She has to keep her toys up there in her baskets. They are not allowed to travel up and down the stairs with her. She and her brother get up in the top and watch movies together in their hideout.
The last thing I need to do is bribe my seamstress mother to make a new canopy for the bed tent. I just need to buy the right material :)
in the future, I might add a platform with drawers underneath to make it a bit higher and to add some storage space. I saw an awesome picture of this idea and thought it was a great idea!
 RSS Feed
